Quantcast
Channel: Tables – Sage X3 – Tips, Tricks and Components
Viewing all 20 articles
Browse latest View live

Using Miscellaneous Tables in Sage ERP X3

$
0
0
Sage X3 has provided the developers with an extensive feature called Miscellaneous Tables, Miscellaneous Tables are logical tables to store codes/List of Values for e.g. Rules, Terms, Payment Methods, etc.. it comes handy whenever we need to provide users with options/drop downs to have strict data integrity.

There are 2 types of Miscellaneous table:

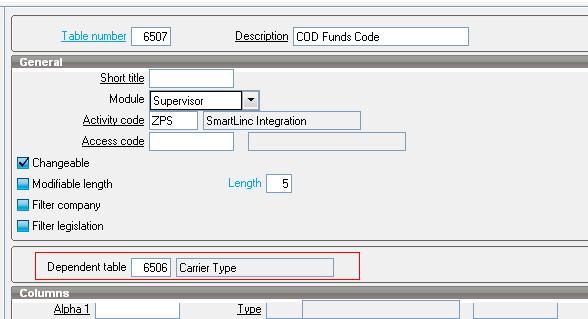
Independent Miscellaneous table: This Table is individual table not dependent on any other Misc Tables for e.g. Payment Modes. As seen in the below screen shot the Dependent Table field is empty which shows the table is independent.

Payment mode is a good example of independent Miscellaneous Table, while we create Payment Terms we need to select the payment Modes, and Payment Modes are defined in the Miscellaneous Table as shown below.
Relational/Hierarchal Miscellaneous Table: We can create a Miscellaneous Table using the menu Development-à Data and Parametersà Miscellaneous Tables. We initially define the miscellaneous table where in we can relate 2 miscellaneous tables similar to parent, child relationship.
· Parent table is defined in child table record
· Child table records reference the parent record.

As shown in the below screen shot the Table Product Sub Category is child of Product Category. Thus the Values of Product Sub Category will be listed depending on Product Category selected.

While we are defining the data for table 21 we need to define the dependence of table 20 on each of the values
Let’s proceed with an Example:

While creating the Product Categories we need to enter the Statistical Group Information, suppose we select the Group1 as 010 then as per the above pictorial data 010 has 4 dependent members in Group2. They are 011,012,013, 014.

Thus when we select the Group1 = 010 in that case the Group2 will show only 4 values as seen below. This is how the relational Miscellaneous table work.

Miscellaneous Tables have default 3 columns added however you can add 4 more columns. As you can see in the below screenshot there is a Section called COLUMNS, which has 4 text where in 2 have Alpha numeric datatypes and other 2 with Numeric datatypes.

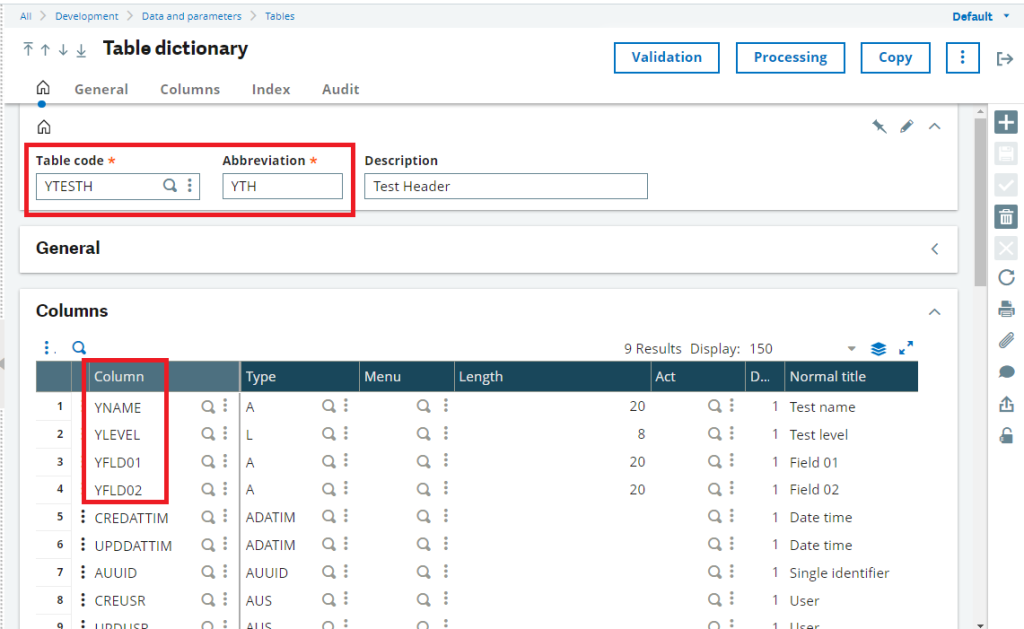
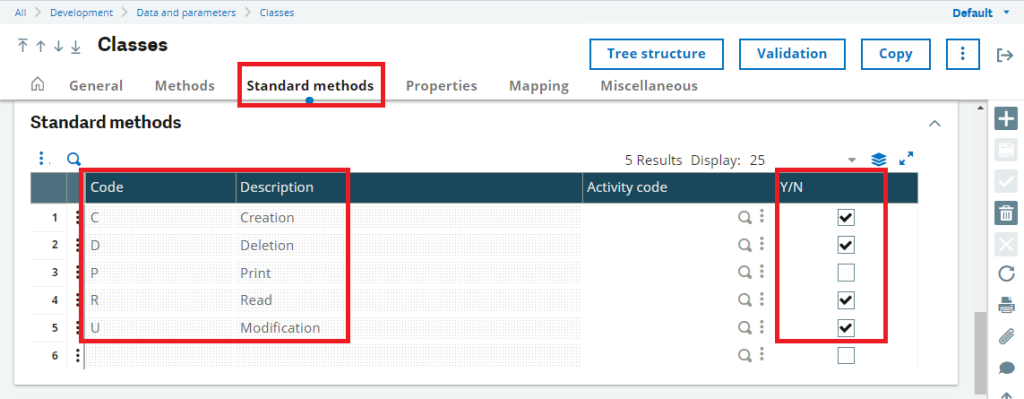
Here you can use these fields for additional columns taking care that only 2 Alphanumeric and 2 Numeric fields can be added.

Just for an example you can check the definition of Miscellaneous table 1 which stated BP Tax Rules using the below 4 columns and displaying the

· Tax Code

· Sales Class

· Rule Type

· Type

Apart from this Miscellaneous have some additional features of seen in the General Section:

Changeable: If this box is un-checked, it will not be possible to modify the contents of this miscellaneous table.

Modifiable length: Define if the length of the code in the miscellaneous table is modifiable. The user will then define the length of these codes by means as a function of personalization of the miscellaneous tables, within the limit of the maximum length defined in the folder parameters.

Filter company : This checkbox is used to display also the column ‘Company’ in the Management of Miscellaneous tables:

Checked : The column “Company group” is displayed in the management of Miscellaneous tables. If the variable GCURLEG is assigned, a filter will be applied on selection and the legislation of the current company will be controlled.

Not checked : Not additional field, no filter

Filter legislation :This checkbox is used to display also the column ‘Legislation’ in the Management of Miscellaneous tables:

Checked : The column “Legislation” is displayed in the management of Miscellaneous tables. If the variable GCURLEG is assigned, a filter will be applied on selection and the legislation of the current company will be controlled.

Not checked : Not additional field, no filter

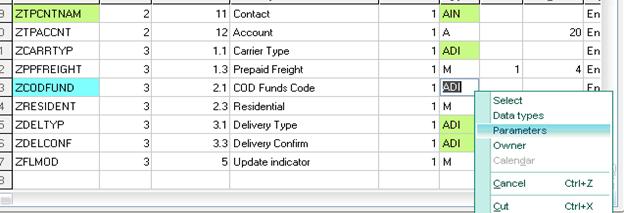
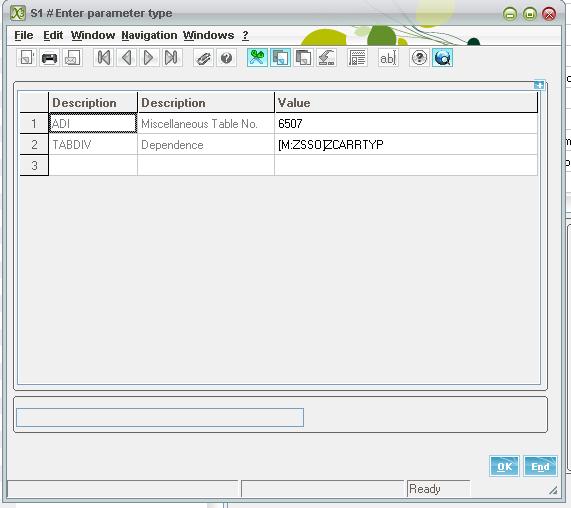
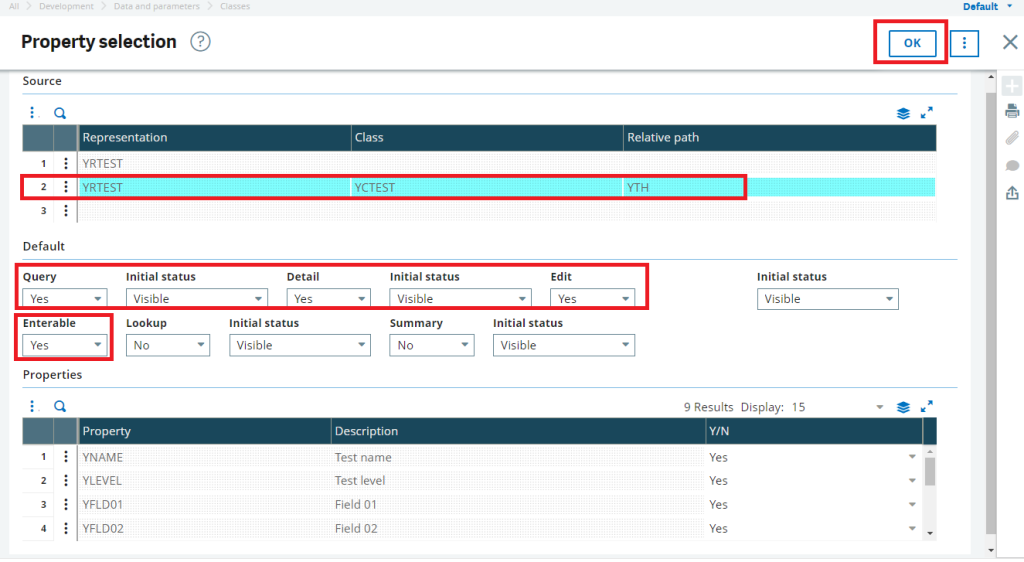
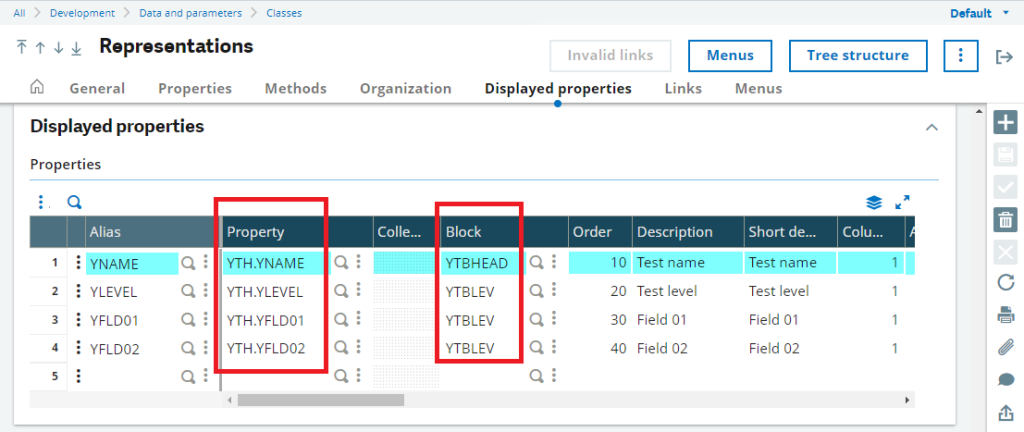
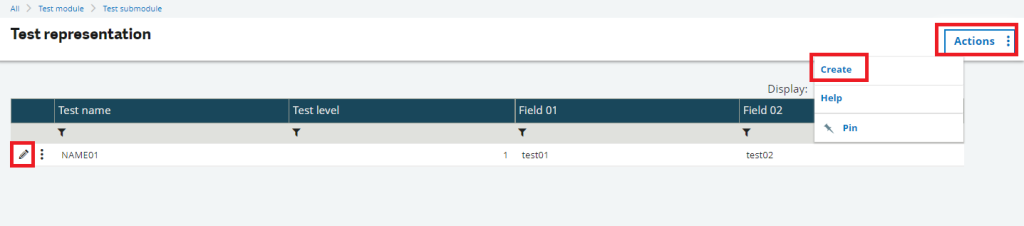
Usage of Miscellaneous Table: Whenever you create a table, we can define a field of type “ADI” which will accept the Miscellaneous Table ID. This field can be displayed as combo box/drop down/check boxes which will display set of default values.

Let us know if we can be of any help, please drop us an email at sage@greytrix.com.


Using the Dependent Miscellaneous Tables in Sage X3

$
0
0

In one of our blogs we have talked about creating the dependency Misc. Tables but during one of our development acquaintances we have come up with another alternative solution as well and are really excited to post it here.

Also ReadUsing Miscellaneous Tables in Sage ERP X3

For achieving the above functionality we need to follow below mentioned steps:

1) Define miscellaneous table for each field and give the name of dependent table as defined in below screen shot:

2) Now add the fields on the screen. The type of the field will be ‘ADI’. Right click on the type and select Parameters (refer below screen shot)

3) Now give the table name in ADI and the name of the field on which the value of current field has to depend (refer below screen shot). 

Auditing Tables in Sage ERP X3

$
0
0

Sage ERP X3 has come up with an interesting feature through which users can now easily Monitor or Audit any changes in X3 Table. For example, if the user wants to Audit new additions into BP Customer table between a selected date ranges then they just have to activate the Audit conditions in the Customer Table.

Also Read:  Auditing Fields in Sage ERP X3

Below is the procedure to activate the Audit table feature for any X3 table.

1. Navigate via Development->Data and Parameters->Tables->Tables and select the Table on which auditing has to be done.

2. Go to “Audit” tab and select the “Type of Audit” as according to your Auditing need, i.e. In case the user wants to audit table whenever a new entry is made in the Table then “Creation” has to be selected; If audit needed for any change in Table entry then select “Modification” and if while Deleting any entry then “Deletion” has to be selected.

3. In order to monitor any Workflow execution associated with the Table, the Workflow checkbox has to be checked.

4. In order to monitor the Table through its Index then the Index Key has to be selected under Tracking Key section.

Below is the screenshot of the Audit tab under Table Maintenance screen

After making changes in the Table to adapt Auditing, any of the changes made in the table would be reflected in the Audit Table screen whenever the Auditing criterion is met. “Audit Table” screen can be opened via Navigating Usage->Audit->Tables where you can select the criteria for check the Audited entries i.e. Data range or/and Table, etc.

Below is the screenshot of the Audit Table screen

“ATABLE” is the table to maintain Audited entries in Sage X3.

Please Note few points,

1. To avail the feature of auditing in your Sage ERP X3, the “AUDIT” activity code has to be made Active.

2. In order to audit Workflow, the “Trigger tracking” checkbox has to be checked under Workflow Rules.

Hope this post is useful…

Auditing Fields in Sage ERP X3

$
0
0

This is in continuation to our last post Auditing Tables in Sage ERP X3. In addition to Auditing the changes in X3 Tables, you can now easily audit specific fields of any Table. For example, if the user wants to Audit the entries in Customer screen whose ABC Class has been modified to “Class A” then the user has to just activate the Audit conditions in the Customer Table and choose the Class Field condition for Audit.

Below is the procedure to enter the Audit condition specific to any Field of an X3 table.

1. Navigate via Development->Data and Parameters->Tables->Tables and select the Table on which auditing has to be done.

2. Go to the “Audit” tab and select the header selections i.e. “Type of Audit”, “Functions” and “Tracking Key” as according to your Auditing need.

3. The “Fields audited” is the section where the audit condition for fields are selected.

Below is the screenshot which shows the “Fields Audited” section along with the condition for “ABC Class” which set to “= Class A”.

Considering the above condition, whenever the ABC Class of any customer is changed to “Class A”, the customer would be saved in Auditing table (ATABLE).

To view all the Audited Field entries, please navigate via Usage->Audit->Fields and select the selection criteria in the Header viz. Date Period and/or table, etc.

Please refer the below screenshot displaying the selected Audit field records based on above condition on BPCUSTOMER table.

Note – To avail the feature of auditing in your Sage ERP X3, the “AUDIT” activity code has to be made Active.

Link tables in Sage ERP X3 through coding

$
0
0

Function name: Link

Description: Link is used to define a set of links between various tables, as well as single abbreviation to access these tables with one instruction.

New Stuff: How to get the number of records modified by Update Command.

Syntax: Link class_p with list_links as class_l

Refer below snippet of code for better clarification.

UntitledAlso Read:
1.
How to get number of hits on a table.
2.How to get the number of records modified by Update Command.
3.
Export transactions to MS Word from Sage X3.
4.
How to create Automatic order invoicing?
5.
Revalidate database objects using activity code.

To update fields of table in workflow

$
0
0

Sometimes we may come under a situation where we need to update fields in the same time when the workflow gets triggered.

To update field on running workflow firstly we need to select a workflow rule. I.e. at what action you need to update the field (For e.g. on Validation, rejection, notification, cancellation etc.)

The action we need to add for this is AWRKUPDFLD. This action has parameters where you can define the name of the table which is linked to the object, fields which needs to be updated and the value of the fields.

We can update only 4 fields with the help of AWRKUPDFLD. We can also define when this action is need to be triggered in ‘triggering’ field and also set a condition for its execution in ‘execution condition’ field.

Workflow Rules screen-adding action

Kindly refer the below fig to know how the parameters should be added.

Workflow Rules Parameter grid

From the above figure, we have mentioned the table abbreviation in ABREV field, mentioned the field name in FLD field and gave the value in VALEUR field.

In the same way we can update maximum 4 fields from the table at a time.

Purchase order result

Hence, make sure the action checkbox is checked for this workflow rule. The fields get updated once this workflow get triggered.

About Us

Greytrix – a globally recognized and one of the oldest Sage Development Partner is a one-stop solution provider for Sage ERP and Sage CRM organizational needs. Being acknowledged and rewarded for multi-man years of experience, we bring complete end-to-end assistance for your technical consultations, product customizations, data migration, system integrations, third-party add-on development and implementation competence.

Greytrix caters to a wide range of Sage X3, a Sage Business Cloud Solution, offerings. Our unique GUMU™ integrations include Sage X3 for Sage CRMSalesforce.com, Dynamics 365 CRM and Magento eCommerce along with Implementation and Technical Support worldwide for Sage X3. Currently we are Sage X3 Implementation Partner in East Africa, Middle East, Australia, Asia, US, UK. We also offer best-in-class Sage X3 customization and development services, integrated applications such as POS | WMS | Payment Gateway | Shipping System | Business Intelligence | eCommerce and have developed add-ons such as Catch – Weight  and Letter of Credit and India Legislation for Sage X3 to Sage business partners, end users and Sage PSG worldwide.

Greytrix is a recognized Sage champion ISV Partner for GUMU™ Sage X3 – Sage CRM integration also listed on Sage Marketplace; GUMU™ integration for Sage X3 – Salesforce is a 5-star rated app listed on Salesforce AppExchange and GUMU™ integration for Dynamics 365 CRM – Sage ERP listed on Microsoft AppSource.

For more information on Sage X3 Integration and Services, please contact us at x3@greytrix.com, We will like to hear from you.

How to display user signature pending for approval to the left list of any transaction

$
0
0

Signature workflow feature of Sage X3 helps in tracking of transactions. Sometimes there might be a requirement if the end user needs to add additional field in left list of any transaction which will display user’s name for whom the signature is pending for approval. We can achieve this by using the following steps.

Consider a purchase order transaction in which the signature workflow is active.

Navigate to All -> Development -> Data and parameters -> Tables

Fig: Workflow tracking archive table

Enter the table code “AWRKHISSUI” as shown in above figure.

This table holds the tracking data for signature workflows.

Fig: Adding new index

Go to “Index” section of the “AWRKHISSUI” table and add new index as shown above which consists of combination of “CLEDEC” and “FLGSIG” field. “CLEDEC” field represents the transaction number of any transaction and “FLGSIG” field represents the signature flag.

Navigate to All -> Development -> Script Dictionary -> Objects

Fig: Opening table in Object

As we are considering purchase order transaction, so enter its object code and go to its “Environment” section in which we need to add workflow tracking archive table and the index we created above with the expression as “[F:POH]POHNUM;3” as shown in above figure, where POHNUM represents transaction number field and “3” is signature field which will represent “To be signed” status for the user signature pending in the workflow.

Fig: Adding new field to selection

Go to “Selection” section in the object screen and add the table “AWRKHISSUI”, User signature pending field “DEST” which will display for whom the signature is pending for approval, as show in above figure.

Navigate to All -> Setup -> Workflow -> Workflow rules

Fig: Workflow rule

As shown above, select the purchase order workflow code which is “POHSIG” and jump to the assignment rules selected for the workflow. Here, it is “YPOHSIG”.

Fig: User assignment values

Add the desired users in the values of assignment rule as shown in above figure.

Now, if we navigate to Purchase order transaction, create one transaction and check its signature circuit, we will be able to see “YUSR1” which is first user yet to be signed as shown in below figure.

Fig: Signature circuit (a)

Since, “YUSR1” is yet to be signed. Hence, we are able to see “YUSR1” in “User Signature pending” field of left list.

Fig: User1 to be signed

After Signature of first user, that is “YUSR1”, if we open signature circuit, we will be able to see second user “YUSR2” is yet to be signed as shown in below figure.

Fig: Signature Circuit (b)

And also we can see “YUSR2” in left list of transaction as expected in the below figure for that transaction.

Fig: User2 to be signed

This blog helps us to add additional field to the left list of any transaction showing which user’s approval is pending for that transaction.

About Us

Greytrix – a globally recognized and one of the oldest Sage Development Partner is a one-stop solution provider for Sage ERP and Sage CRM organizational needs. Being acknowledged and rewarded for multi-man years of experience, we bring complete end-to-end assistance for your technical consultations, product customizations, data migration, system integrations, third-party add-on development and implementation competence.

Greytrix caters to a wide range of Sage X3, a Sage Business Cloud Solution, offerings. Our unique GUMU™ integrations include Sage X3 for Sage CRMSalesforce.com, Dynamics 365 CRM and Magento eCommerce along with Implementation and Technical Support worldwide for Sage X3. Currently we are Sage X3 Implementation Partner in East Africa, Middle East, Australia, Asia, US, UK. We also offer best-in-class Sage X3 customization and development services, integrated applications such as POS | WMS | Payment Gateway | Shipping System | Business Intelligence | eCommerce and have developed add-ons such as Catch – Weight  and Letter of Credit and India Legislation for Sage X3 to Sage business partners, end users and Sage PSG worldwide.

Greytrix is a recognized Sage champion ISV Partner for GUMU™ Sage X3 – Sage CRM integration also listed on Sage Marketplace; GUMU™ integration for Sage X3 – Salesforce is a 5-star rated app listed on Salesforce AppExchange and GUMU™ integration for Dynamics 365 CRM – Sage ERP listed on Microsoft AppSource.

For more information on Sage X3 Integration and Services, please contact us at x3@greytrix.com, We will like to hear from you.

How to delete the U tables after post-migration in Sage X3

$
0
0

Now days Every company wants to upgrade the system or data with newly functionality on the higher version. In Some industries the company wants to migrate the data from lower version to higher version in Sage X3. For those needs to done some steps in Sage X3 i.e., Execution of Pre-migration and Post-migration script in the source and destination system. After post-migration process user needs to delete the U tables (Temporary tables) which are created at the time of pre-migration process. This phase is manual It will be triggered by the execution of the TRTMIGDEL processing from the processing execution function. Its execution will provoke the deletion of all the tables bearing the activity code MIG.

As this phase is irreversible, it is important to have made sure, previously, that the migration processing routines have been carried out properly.

Since keeping temporary tables in the folder does not prevent from resuming operations (this supposes of course that there is enough space on the disk), it is possible to keep these tables in line during several weeks after resuming operations. Therefore, should any problem rise in the weeks following the migration, it will be possible to have some original data available for comparison or analysis.

This phase is manual It will be triggered by the execution of the TRTMIGDEL processing from the processing execution function. Its execution will provoke the deletion of all the tables bearing the activity code MIG.

As this phase is irreversible, it is important to have made sure, previously, that the migration processing routines have been carried out properly.

Since keeping temporary tables in the folder does not prevent from resuming operations (this supposes of course that there is enough space on the disk), it is possible to keep these tables in line during several weeks after resuming operations. Therefore, should any problem rise in the weeks following the migration, it will be possible to have some original data available for comparison or analysis.

Follow the below steps:

After migrated folder validation process one log will be generated with the below message as shown in below figure,

Fig : Folder validation

If the folder validation process is not successfully completed, we cannot proceed for further process, as shown in below figure,

Fig : Folder validation error
  • After the folder validation process run the post-migration utility through a sequencing monitor screen from X3.
  • Once post-migration script process is successfully done, then we need to check the data are successfully transferred into the original tables.
  • Once your upgrade has been validated, you may drop the temporary U* tables which have the MIG activity code by launching the TRTMIGDEL program from process execution function.

Navigate to: Development> Utilities > Miscellaneous > Run process

Enter the TRTMIGDEL in a script file field and click on Ok button, as shown in below fig,

Fig : Process Execution

Now select the folder in which folder you want to run this script, as shown in below figure.

Fig : Folder Selection

Clicking on the OK button the process will run and one log file will be generated.

With the help of above process, you can delete the Temporary tables (i.e., U tables) after post-migration process.

About Us

Greytrix – a globally recognized and one of the oldest Sage Development Partner is a one-stop solution provider for Sage ERP and Sage CRM organizational needs. Being acknowledged and rewarded for multi-man years of experience, we bring complete end-to-end assistance for your technical consultations, product customizations, data migration, system integrations, third-party add-on development and implementation competence.

Greytrix caters to a wide range of Sage X3, a Sage Business Cloud Solution, offerings. Our unique GUMU™ integrations include Sage X3 for Sage CRMSalesforce.com, Dynamics 365 CRM and Magento eCommerce along with Implementation and Technical Support worldwide for Sage X3. Currently we are Sage X3 Implementation Partner in East Africa, Middle East, Australia, Asia, US, UK. We also offer best-in-class Sage X3 customization and development services, integrated applications such as POS | WMS | Payment Gateway | Shipping System | Business Intelligence | eCommerce and have developed add-ons such as Catch – Weight  and Letter of Credit and India Legislation for Sage X3 to Sage business partners, end users and Sage PSG worldwide.

Greytrix is a recognized Sage champion ISV Partner for GUMU™ Sage X3 – Sage CRM integration also listed on Sage Marketplace; GUMU™ integration for Sage X3 – Salesforce is a 5-star rated app listed on Salesforce AppExchange and GUMU™ integration for Dynamics 365 CRM – Sage ERP listed on Microsoft AppSource.

For more information on Sage X3 Integration and Services, please contact us at x3@greytrix.com, We will like to hear from you.


How to display user signature pending for approval to the left list of any transaction

$
0
0

Signature workflow feature of Sage X3 helps in tracking of transactions. Sometimes there might be a requirement if the end user needs to add additional field in left list of any transaction which will display user’s name for whom the signature is pending for approval. We can achieve this by using the following steps.

Consider a purchase order transaction in which the signature workflow is active.

Navigate to All -> Development -> Data and parameters -> Tables

Fig: Workflow tracking archive table

Enter the table code “AWRKHISSUI” as shown in above figure.

This table holds the tracking data for signature workflows.

Fig: Adding new index

Go to “Index” section of the “AWRKHISSUI” table and add new index as shown above which consists of combination of “CLEDEC” and “FLGSIG” field. “CLEDEC” field represents the transaction number of any transaction and “FLGSIG” field represents the signature flag.

Navigate to All -> Development -> Script Dictionary -> Objects

Fig: Opening table in Object

As we are considering purchase order transaction, so enter its object code and go to its “Environment” section in which we need to add workflow tracking archive table and the index we created above with the expression as “[F:POH]POHNUM;3” as shown in above figure, where POHNUM represents transaction number field and “3” is signature field which will represent “To be signed” status for the user signature pending in the workflow.

Fig: Adding new field to selection

Go to “Selection” section in the object screen and add the table “AWRKHISSUI”, User signature pending field “DEST” which will display for whom the signature is pending for approval, as show in above figure.

Navigate to All -> Setup -> Workflow -> Workflow rules

Fig: Workflow rule

As shown above, select the purchase order workflow code which is “POHSIG” and jump to the assignment rules selected for the workflow. Here, it is “YPOHSIG”.

Fig: User assignment values

Add the desired users in the values of assignment rule as shown in above figure.

Now, if we navigate to Purchase order transaction, create one transaction and check its signature circuit, we will be able to see “YUSR1” which is first user yet to be signed as shown in below figure.

Fig: Signature circuit (a)

Since, “YUSR1” is yet to be signed. Hence, we are able to see “YUSR1” in “User Signature pending” field of left list.

Fig: User1 to be signed

After Signature of first user, that is “YUSR1”, if we open signature circuit, we will be able to see second user “YUSR2” is yet to be signed as shown in below figure.

Fig: Signature Circuit (b)

And also we can see “YUSR2” in left list of transaction as expected in the below figure for that transaction.

Fig: User2 to be signed

This blog helps us to add additional field to the left list of any transaction showing which user’s approval is pending for that transaction.

About Us

Greytrix – a globally recognized and one of the oldest Sage Development Partner is a one-stop solution provider for Sage ERP and Sage CRM organizational needs. Being acknowledged and rewarded for multi-man years of experience, we bring complete end-to-end assistance for your technical consultations, product customizations, data migration, system integrations, third-party add-on development and implementation competence. 

Greytrix caters to a wide range of Sage X3, a Sage Business Cloud Solution, offerings. Our unique GUMU™ integrations include Sage X3 for Sage CRMSalesforce.com, Dynamics 365 CRM and Magento eCommerce along with Implementation and Technical Support worldwide for Sage X3. Currently we are Sage X3 Implementation Partner in East Africa, Middle East, Australia, Asia, US, UK. We also offer best-in-class Sage X3 customization and development services, integrated applications such as POS | WMS | Payment Gateway | Shipping System | Business Intelligence | eCommerce and have developed add-ons such as Catch – Weight  and Letter of Credit and India Legislation for Sage X3 to Sage business partners, end users and Sage PSG worldwide. Greytrix Sales Commission App for Sage X3 simplifies commission calculations and postings on sales transactions.

The GUMU™ Cloud framework by Greytrix forms the backbone of cloud integrations that are managed in real-time for processing and execution of application programs at the click of a button.

Greytrix is a recognized Sage champion ISV Partner for GUMU™ Sage X3 – Sage CRM integration also listed on Sage Marketplace; GUMU™ integration for Sage X3 – Salesforce is a 5-star rated app listed on Salesforce AppExchange and GUMU™ integration for Dynamics 365 CRM – Sage ERP listed on Microsoft AppSource.

For more information on Sage X3 Integration and Services, please contact us at x3@greytrix.com, We would like to hear from you.

How to delete the U tables after post-migration in Sage X3

$
0
0

Now days Every company wants to upgrade the system or data with newly functionality on the higher version. In Some industries the company wants to migrate the data from lower version to higher version in Sage X3. For those needs to done some steps in Sage X3 i.e., Execution of Pre-migration and Post-migration script in the source and destination system. After post-migration process user needs to delete the U tables (Temporary tables) which are created at the time of pre-migration process. This phase is manual It will be triggered by the execution of the TRTMIGDEL processing from the processing execution function. Its execution will provoke the deletion of all the tables bearing the activity code MIG.

As this phase is irreversible, it is important to have made sure, previously, that the migration processing routines have been carried out properly.

Since keeping temporary tables in the folder does not prevent from resuming operations (this supposes of course that there is enough space on the disk), it is possible to keep these tables in line during several weeks after resuming operations. Therefore, should any problem rise in the weeks following the migration, it will be possible to have some original data available for comparison or analysis.

This phase is manual It will be triggered by the execution of the TRTMIGDEL processing from the processing execution function. Its execution will provoke the deletion of all the tables bearing the activity code MIG.

As this phase is irreversible, it is important to have made sure, previously, that the migration processing routines have been carried out properly.

Since keeping temporary tables in the folder does not prevent from resuming operations (this supposes of course that there is enough space on the disk), it is possible to keep these tables in line during several weeks after resuming operations. Therefore, should any problem rise in the weeks following the migration, it will be possible to have some original data available for comparison or analysis.

Follow the below steps:

After migrated folder validation process one log will be generated with the below message as shown in below figure,

Fig : Folder validation

If the folder validation process is not successfully completed, we cannot proceed for further process, as shown in below figure,

Fig : Folder validation error
  • After the folder validation process run the post-migration utility through a sequencing monitor screen from X3.
  • Once post-migration script process is successfully done, then we need to check the data are successfully transferred into the original tables.
  • Once your upgrade has been validated, you may drop the temporary U* tables which have the MIG activity code by launching the TRTMIGDEL program from process execution function.

Navigate to: Development> Utilities > Miscellaneous > Run process

Enter the TRTMIGDEL in a script file field and click on Ok button, as shown in below fig,

Fig : Process Execution

Now select the folder in which folder you want to run this script, as shown in below figure.

Fig : Folder Selection

Clicking on the OK button the process will run and one log file will be generated.

With the help of above process, you can delete the Temporary tables (i.e., U tables) after post-migration process.

About Us

Greytrix – a globally recognized and one of the oldest Sage Development Partner is a one-stop solution provider for Sage ERP and Sage CRM organizational needs. Being acknowledged and rewarded for multi-man years of experience, we bring complete end-to-end assistance for your technical consultations, product customizations, data migration, system integrations, third-party add-on development and implementation competence. 

Greytrix caters to a wide range of Sage X3, a Sage Business Cloud Solution, offerings. Our unique GUMU™ integrations include Sage X3 for Sage CRMSalesforce.com, Dynamics 365 CRM and Magento eCommerce along with Implementation and Technical Support worldwide for Sage X3. Currently we are Sage X3 Implementation Partner in East Africa, Middle East, Australia, Asia, US, UK. We also offer best-in-class Sage X3 customization and development services, integrated applications such as POS | WMS | Payment Gateway | Shipping System | Business Intelligence | eCommerce and have developed add-ons such as Catch – Weight  and Letter of Credit and India Legislation for Sage X3 to Sage business partners, end users and Sage PSG worldwide. Greytrix Sales Commission App for Sage X3 simplifies commission calculations and postings on sales transactions.

The GUMU™ Cloud framework by Greytrix forms the backbone of cloud integrations that are managed in real-time for processing and execution of application programs at the click of a button.

Greytrix is a recognized Sage champion ISV Partner for GUMU™ Sage X3 – Sage CRM integration also listed on Sage Marketplace; GUMU™ integration for Sage X3 – Salesforce is a 5-star rated app listed on Salesforce AppExchange and GUMU™ integration for Dynamics 365 CRM – Sage ERP listed on Microsoft AppSource.

For more information on Sage X3 Integration and Services, please contact us at x3@greytrix.com, We would like to hear from you.

How to perform CRUD operations using classes and representations in Sage X3 V12.

$
0
0

Introduction:

Sage X3 provides various features with user friendly screens and their amazing functionalities. The screens can be of various types such object based, function action based, inquiry screens , etc. For performing create, read, update and delete operations on a table, we need to have a screen for entering those data but what if there is a requirement where the user does not have any screen and have to perform CRUD operations on a particular table.This can be achieved by one of the features provided by Sage X3 using classes and representations concepts.

In this blog we will perform the basic read and write operations using classes and representation instead of creating objects and screens. Consider an example where the user wants to perform CRUD operations on a table.

Navigate to All -> Development -> Data and parameters -> Tables

Create a new table with some sample fields as shown in below figure.

Fig01 : Table

Navigate to All -> Development -> Data and parameters -> Classes

Create a new class, enter the class code , select type as “Persistent”, table-view as table created earlier as well as the index code, as shown in below figure.

Fig02 : Test Class creation

Go to the “Properties” tab and click on the action button (3 dots) and select the “Column selection” option as shown in the figure below.

Fig03 : Class property selection

As shown in below figure, after selecting the “Column selection” option, the screen below will appear. Check the fields and select “Yes” in the “Y/N” column and click on the “OK” button  so that these fields will be included from the table created earlier into the class.

Fig04 : Column selection

Now, create the class , go to the “Standard methods” tab and select the methods the user needs to perform such as creation, read, deletion, etc. as shown in the below figure.

Fig05 : Standard method selections

Click on “Save” ,“Validation” and “Global Validation” buttons.

Next, we need to create a representation for this class.

Navigate to All -> Development -> Data and parameters -> Representations

Enter the representation code, description and class code as shown in below figure. (Note : Instance will be added automatically.)

Fig06 : Test representation creation

Go to Managed behaviors block in the “General” tab and ensure creation, update and deletion checkboxes are checked active or not, if not make them “Active”.

Next, go to the “Organization” tab, create sections and blocks as shown below, later on you will see how they will look when the user opens the representation.

Fig07 : Section and block setup

Now, go to the “Displayed properties” tab and click on the action button (3 dots) and select “selection” option and the below screen will appear.

Fig08 : Displayed properties setup

Select “Query” , “Detail”, “Edit”, “Enterable” options as “Yes” and “Initial status” as “Visible” and then click on the “OK” button.

The user will be able to see the below screen and can select the block wanted to be displayed on whether header or detail facet.

Fig09 : Block selection for properties

In future if needed to add more fields in the table, they can be added similarly as above in the classes and representations.

Click on “Save”, “Validation” and then “Global Validation” for effecting the changes done in representation.

Next, create a menu item with “Link Type” as “Representation” , in “Representation” option , enter the representation code (here “YRTEST”) and in “Entity” option, enter the class code (here “YCTEST”) and add it in the navigation pages where the user wants to be accessed.

After clicking on the menu item, the user will be able to see the below screen where the user can create and edit the records with header & detail information.

Fig10 : Sample representation user interface

In this way, the user can perform CRUD operations using classes and representations without creating screens and objects.

This blog helps us to understand how the user can perform CRUD operations using classes and representations without creating screens and objects.

About Us
Greytrix – a globally recognized Premier Sage Gold Development Partner is a one-stop solution provider for Sage ERP and Sage CRM needs. Being recognized and rewarded for multi-man years of experience, we bring complete end-to-end assistance for your technical consultations, product customizations, data migration, system integrations, third-party add-on development and implementation expertise.

Greytrix caters to a wide range of Sage X3 (Sage Enterprise Management) offerings – a Sage Business Cloud Solution. Our unique GUMU™ integrations include Sage X3 for Sage CRM, Salesforce.com and Magento eCommerce along with Implementation and Technical Support worldwide for Sage X3 (Sage Enterprise Management). Currently we are Sage X3 Implementation Partner in East Africa, Middles East, Australia, Asia. We also offer best-in-class Sage X3 customization and development services, integrated applications such as POS | WMS | Payment Gateway | Shipping System | Business Intelligence | eCommerce and have developed add-ons such as Catch – Weight and Letter of Credit for Sage X3 to Sage business partners, end users and Sage PSG worldwide.

Greytrix is a recognized Sage Rockstar ISV Partner for GUMU™ Sage X3 – Sage CRM integration also listed on Sage Marketplace; GUMU™ integration for Sage X3 – Salesforce is a 5-star app listed on Salesforce AppExchange.

For more information on Sage X3 Integration and Services, please contact us at mailto: x3@greytrix.com. We will be glad to assist you.

How to store more than 250 char in sage X3 table

$
0
0

In the Sage X3 application, one of our clients is facing difficulties in storing strings of 250+ characters in Sage X3 tables. The standard for alphanumeric datatype in Sage X3 tables support only a length of 250 characters, and our client wanted to store strings exceeding this limit.

To solve this problem, we discovered and tried the AC0 datatype.

The ‘AC0’ datatype is used to store alphanumeric information exceeding 250 characters, and in the database, it is stored as a CLOB datatype.

CLOB (Character Large Objects) fields contain rich text or plain text data and are stored directly in the database.

How to add an AC0 field in a Sage X3 table:

Step1: Create a new table.

Step2: Add a new column (for example, I have added a new ‘ZTEST’ column).


Step 3: After adding the column, select the data type ‘AC0,’ specify the length, and fill in all other details.

New Stuff: Error: “@X3.TRTGCONSULT$adx (1557) Error 24 Sequential File Management Error ST” in Sage X3

Table Columns
Table Columns

How can we display AC0 field data in a Sage X3 screen?

Go to the screen and add the ‘AC0’ field with a graphical object, such as multi-line text.

Screen Fields 1
Screen Fields 1
Screen Fields 2
Screen Fields 2

So by using AC0 datatype and following these simple steps, we can increase the length of Sage X3 tables more than 250 characters.

Guide to add SQL Query in Sage Enterprise Intelligence (SEI)

$
0
0

If you need to retrieve data based on a more complex query than just selecting the field from a single table, you will need this feature. The SQL Query can be as much complicated as the database provider can support. This means that you could join tables, do summarization and grouping without any issues.

Follow the below steps to achieve SQL Query:

  1. From the Tables window, in the upper left hand corner, click Add and select Add SQL Query.

2. In the Destination Table Name field, enter a name for the table destination.

3. In the SQL Expression text box, enter the SQL statement and click Save.

Important:

Using of the schema name in the SQL statement is highly recommended.

Tip:

Variables can also be used to create queries in an SQL statement.

Example:

         SELECT * FROM TABLE WHERE YEAR = @YEAR

Note:

The QUERY will be added in the list.

Once in the list, you can:

  • Do a mouse over to see the whole SQL statement,
  • Click on the QUERY hyperlink in the Table Source column to change the statement any time,
  • Apply a filter directly in the query statement (ex: select field1, sum(qty) from schema.table1 group by field1 where field2 = 2023) or in the row of the Filter column as a regular table If you are looking for more clarity.

Tip:

You can also get access to the Tables windows by clicking on the hyperlink within the Tables column on the Extraction page.

About Us

Greytrix – a globally recognized Premier Sage Gold Development Partner is a one-stop solution provider for Sage ERP and Sage CRM needs. Being recognized and rewarded for multi-man years of experience, we bring complete end-to-end assistance for your technical consultations, product customizations, data migration, system integrations, third-party add-on development and implementation expertise.

Greytrix caters to a wide range of Sage X3 (Sage Enterprise Management) offerings – a Sage Business Cloud Solution. Our unique GUMU™ integrations include Sage X3 for Sage CRMSalesforce.com and Magento eCommerce along with Implementation and Technical Support worldwide for Sage X3 (Sage Enterprise Management). Currently we are Sage X3 Implementation Partner in East Africa, Middles East, Australia, Asia. We also offer best-in-class Sage X3 customization and development services, integrated applications such as POS | WMS | Payment Gateway | Shipping System | Business Intelligence | eCommerce and have developed add-ons such as Catch – Weight  and Letter of Credit for Sage X3 to Sage business partners, end users and Sage PSG worldwide.

Greytrix is a recognized Sage Rockstar ISV Partner for GUMU™ Sage X3 – Sage CRM integration also listed on Sage Marketplace; GUMU™ integration for Sage X3 – Salesforce is a 5-star app listed on Salesforce AppExchange.

For more information on Sage X3 Integration and Services, please contact us at x3@greytrix.com. We will be glad to assist you.


How to add new fields in left list in Sage X3

$
0
0

A purchase request is a written request that lists the items that are required, how many are needed, and when they will be required. It becomes a purchase order after it is authorized. An unapproved purchase order is called a purchase request. The purchase request lists all necessary goods and services along with their respective quantities, suppliers, and associated expenses.

A purchase order is used by a buyer to place an order and is issued before delivery. An invoice is issued by a seller using invoicing software after an order is delivered. It defines the amount the buyer owes for the purchased goods and the date by which the buyer needs to pay.

In Sage X3, we can manage the purchase requirements of different departments or sites of a company in purchasing, purchase requests, and purchase requests. Here, you can create, modify, delete, copy, view, and print purchase requests.

Follow the below steps:

Navigate to : Development > Script dictionary > Objects

Fig01: Basic Object Screen

Navigate to the Environment tab in the Object, then add the table PRECEIPTD, its corresponding index, and link expression with [F:PTH]PTHNUM;1000 using the abbreviation ZPTD in the Tables to open column. Go to the Selection Tab after adding it to the Environment tab.

Fig02: Adding expression

Add the expression [F:ZPTD]POHNUM with the appropriate description and type POH to the Expression column of the Selection tab. Then, click Save to validate the corresponding object.

Fig03: Field added in Left list section

The purchase order number field is now visible in the left list of the Purchase receipts screen.

About Us

Greytrix – a globally recognized Premier Sage Gold Development Partner is a one-stop solution provider for Sage ERP and Sage CRM needs. Being recognized and rewarded for multi-man years of experience, we bring complete end-to-end assistance for your technical consultations, product customizations, data migration, system integrations, third-party add-on development and implementation expertise.

Greytrix caters to a wide range of Sage X3 (Sage Enterprise Management) offerings – a Sage Business Cloud Solution. Our unique GUMU™ integrations include Sage X3 for Sage CRMSalesforce.com and Magento eCommerce along with Implementation and Technical Support worldwide for Sage X3 (Sage Enterprise Management). Currently we are Sage X3 Implementation Partner in East Africa, Middles East, Australia, Asia. We also offer best-in-class Sage X3 customization and development services, integrated applications such as POS | WMS | Payment Gateway | Shipping System | Business Intelligence | eCommerce and have developed add-ons such as Catch – Weight  and Letter of Credit for Sage X3 to Sage business partners, end users and Sage PSG worldwide.

Greytrix is a recognized Sage Rockstar ISV Partner for GUMU™ Sage X3 – Sage CRM integration also listed on Sage Marketplace; GUMU™ integration for Sage X3 – Salesforce is a 5-star app listed on Salesforce AppExchange.

For more information on Sage X3 Integration and Services, please contact us at x3@greytrix.com. We will be glad to assist you.

Workflow Auditing Streamlining Transparency Across Operations in Sage X3

$
0
0

In Sage X3, workflow auditing involves tracking and recording the changes made to any documents as they progress through the workflow. This is useful for maintaining transparency, ensuring compliance, and identifying any discrepancies or issues in the process. Below are general steps to set up and perform workflow auditing on sales orders in Sage X3

*Note: We will be using the “Sales Orders” table (SORDER) in this example, but you can apply these methods to any table/fields you choose.

Access Rights: Ensure that users involved in the sales order workflow have appropriate access rights to view and edit sales orders. This includes access to the workflow and relevant screens.

Define Workflow: Define the sales order workflow in Sage X3. This involves specifying the different stages through which a sales order passes.

Set up workflow rules and conditions to determine how the sales order should progress through each stage.

Audit Configuration: In Sage X3, configure audit settings to capture changes made to sales orders. This may include changes to order status, quantities, prices, customer details, and other relevant information.

Audit
Fig01: Audit

Audit configuration settings can usually be found in the Administration module.

Enable Audit Trails: Activate audit trails for sales orders. This is typically done in the parameters or settings related to auditing within Sage X3.

Define which specific fields or actions you want to track in the sales order audit trail.

Audit Reports: Utilize Sage X3’s reporting capabilities to generate audit reports for sales orders. These reports should provide a comprehensive view of all changes made to sales orders within the specified timeframe.

Common audit reports may include details such as user activity, date and time of changes, and the nature of the modifications.

Monitoring and Alerts: Set up monitoring and alert systems to notify relevant users or administrators of significant changes or actions within the sales order workflow.

Alerts can be configured based on specific criteria, such as the approval of high-value orders or changes to critical order information.

About Us

Greytrix – a globally recognized Premier Sage Gold Development Partner is a one-stop solution provider for Sage ERP and Sage CRM needs. Being recognized and rewarded for multi-man years of experience, we bring complete end-to-end assistance for your technical consultations, product customizations, data migration, system integrations, third-party add-on development and implementation expertise.

Greytrix caters to a wide range of Sage X3 (Sage Enterprise Management) offerings – a Sage Business Cloud Solution. Our unique GUMU™ integrations include Sage X3 for Sage CRMSalesforce.com and Magento eCommerce along with Implementation and Technical Support worldwide for Sage X3 (Sage Enterprise Management). Currently we are Sage X3 Implementation Partner in East Africa, Middles East, Australia, Asia. We also offer best-in-class Sage X3 customization and development services, integrated applications such as POS | WMS | Payment Gateway | Shipping System | Business Intelligence | eCommerce and have developed add-ons such as Catch – Weight  and Letter of Credit for Sage X3 to Sage business partners, end users and Sage PSG worldwide.

Greytrix is a recognized Sage Rockstar ISV Partner for GUMU™ Sage X3 – Sage CRM integration also listed on Sage Marketplace; GUMU™ integration for Sage X3 – Salesforce is a 5-star app listed on Salesforce AppExchange.

For more information on Sage X3 Integration and Services, please contact us at x3@greytrix.com. We will be glad to assist you.

Auditing Tables in Sage ERP X3

$
0
0

Sage ERP X3 has come up with an interesting feature through which users can now easily Monitor or Audit any changes in X3 Table. For example, if the user wants to Audit new additions into BP Customer table between a selected date ranges then they just have to activate the Audit conditions in the Customer Table.

Also Read:  Auditing Fields in Sage ERP X3

Below is the procedure to activate the Audit table feature for any Sage X3 table.

  1. Navigate via Development->Data and Parameters->Tables->Tables and select the Table on which auditing has to be done.
  2. Go to “Audit” tab and select the “Type of Audit” as according to your Auditing need, i.e. In case the user wants to audit table whenever a new entry is made in the Table then “Creation” has to be selected; If audit needed for any change in Table entry then select “Modification” and if while Deleting any entry then “Deletion” has to be selected.
  3. In order to monitor any Workflow execution associated with the Table, the Workflow checkbox has to be checked.
  4. In order to monitor the Table through its Index then the Index Key has to be selected under the Tracking Key section.
    Below is the screenshot of the Audit tab under Table Maintenance screen
  5. After making changes in the Table to adapt Auditing, any of the changes made in the table would be reflected in the Audit Table screen whenever the Auditing criterion is met. “Audit Table” screen can be opened via Navigating Usage->Audit->Tables where you can select the criteria for check the Audited entries i.e. Data range or/and Table, etc.
    Below is the screenshot of the Audit Table screen
    “ATABLE” is the table to maintain Audited entries in Sage X3.

Please Note few points,

  • To avail the feature of auditing in your Sage ERP X3, the “AUDIT” activity code has to be made Active.
  • In order to audit Workflow, the “Trigger tracking” checkbox has to be checked under Workflow Rules.

Hope this post is useful!

About Us
Greytrix – a globally recognized Premier Sage Gold Development Partner is a one-stop solution provider for Sage ERP and Sage CRM needs. Being recognized and rewarded for multi-man years of experience, we bring complete end-to-end assistance for your technical consultations, product customizations, data migration, system integrations, third-party add-on development and implementation expertise.

Greytrix caters to a wide range of Sage Enterprise Management (Sage X3) offerings – a Sage Business Cloud Solution. Our unique GUMU™ integrations include Sage Enterprise Management (Sage X3) for Sage CRMSalesforce.com and Magento eCommerce along with Implementation and Technical Support worldwide for Sage Enterprise Management (Sage X3). Currently we are Sage Enterprise Management Implementation Partner in East Africa, Middles East, Australia, Asia. We also offer best-in-class Sage X3 customization and development services, integrated applications such as POS | WMS | Payment Gateway | Shipping System | Business Intelligence | eCommerce and have developed add-ons such as Catch – Weight  and Letter of Credit for Sage Enterprise Management to Sage business partners, end users and Sage PSG worldwide.

Greytrix is a recognized Sage Rockstar ISV Partner for GUMU™ Sage Enterprise Management – Sage CRM integration also listed on Sage Marketplace; GUMU™ integration for Sage Enterprise Management – Salesforce is a 5-star app listed on Salesforce AppExchange.

For more information on Sage X3 Integration and Services, please contact us at x3@greytrix.com. We will be glad to assist you.

Understanding Class Management in Sage X3

$
0
0

Have you ever wondered how software systems like Sage X3 efficiently manage data entities, such as customers, products, and sales orders? The answer lies in the concept of classes, a crucial component of the Sage X3 ecosystem. In this blog, we will explore the intricacies of class management within Sage X3 and how it plays a pivotal role in structuring and handling data entities.

Introduction:

At the heart of Sage X3’s data management lies the concept of classes. A class serves as a blueprint for managing various entities, ranging from customers to general ledger entries, products, sales orders, and more. In this blog, we will delve into the details of class management, its components, and its significance within Sage X3.

Class Essentials:

In Sage X3, classes are essential for structuring and managing data entities. The information within a class is organized into distinct sections, each serving a specific purpose. These sections include:

1. Header Information:

   – Contains details for identifying the class, including header code, description, and type.

2. General Section:

   – Describes the primary information related to the class, including management mode, type, and more.

3. Main Table:

   – Defines the primary database table used when the class is persistent and details about the main index.

4. Additional Information:

   – Includes activity codes, technical module associations, cache settings, search-ability, and more.

5. Collection:

   – Describes class collections, their attributes, and settings.

6. Scripts:

   – Adding custom code related to supervisor events, especially for CRUD (Create, Read, Update, Delete) management.

7. Methods Section:

   – Defines additional methods and operations available for the class, distinguishing between operations and methods.

8. Standard Methods Section:

   – Describes the availability of standard CRUD methods and other methods supported by the supervisor layer on the class.

9. Properties Section:

   – Lists and defines the properties associated with the class, including data types, menus, control tables, and more.

10. Mapping Section:

    – Specifies how CRUD operations are linked to the database tables, including the main table and child classes.

11. Miscellaneous Section:

    – Contains additional information for access rights, filters, history, and linked objects.

Class Management:

Class management in Sage X3 involves configuring the class to ensure data integrity, optimize performance, and enable seamless data interactions. This section covers settings like reading, creation, modification, deletion, filters, and more.

Validation:

One of the critical aspects of class management is validation, where the class description is checked for global consistency. During validation, code generation occurs, creating scripts and business logic associated with CRUD operations. It’s important to note that any generated program should not be modified, as it will be automatically recreated during validation.

Hierarchy:

The hierarchy feature offers a visual representation of class relationships. This is particularly useful for understanding how classes are connected and how data flows within Sage X3.

In the world of Sage X3, class management is the backbone of data entity handling. Understanding the intricacies of classes and their various components is essential for optimizing data management, maintaining data integrity, and ensuring efficient data interactions within your Sage X3 system.

As you venture further into the world of Sage X3, a strong grasp of class management will empower you to harness the full potential of this powerful enterprise resource planning (ERP) solution. Whether you’re configuring classes for customers, products, or other data entities, the knowledge shared in this blog will serve as your guiding light.

About Us

Greytrix – a globally recognized Premier Sage Gold Development Partner is a one-stop solution provider for Sage ERP and Sage CRM needs. Being recognized and rewarded for multi-man years of experience, we bring complete end-to-end assistance for your technical consultations, product customizations, data migration, system integrations, third-party add-on development and implementation expertise.

Greytrix caters to a wide range of Sage X3 (Sage Enterprise Management) offerings – a Sage Business Cloud Solution. Our unique GUMU™ integrations include Sage X3 for Sage CRMSalesforce.com and Magento eCommerce along with Implementation and Technical Support worldwide for Sage X3 (Sage Enterprise Management). Currently we are Sage X3 Implementation Partner in East Africa, Middles East, Australia, Asia. We also offer best-in-class Sage X3 customization and development services, integrated applications such as POS | WMS | Payment Gateway | Shipping System | Business Intelligence | eCommerce and have developed add-ons such as Catch – Weight  and Letter of Credit for Sage X3 to Sage business partners, end users and Sage PSG worldwide.

Greytrix is a recognized Sage Rockstar ISV Partner for GUMU™ Sage X3 – Sage CRM integration also listed on Sage Marketplace; GUMU™ integration for Sage X3 – Salesforce is a 5-star app listed on Salesforce AppExchange.

For more information on Sage X3 Integration and Services, please contact us at x3@greytrix.com. We will be glad to assist you.

How to make use of Sage X3 dashboard to display data from other tables

$
0
0

Retrieving data from a single table for the Sage X3 dashboard is straightforward. However, if you require data from multiple tables or linked tables, attempting to add a field from those tables triggers an error message: “Standard Query ‘QUERY_CODE’: Links not possible.” In our recent blog post, we’ve provided a clear solution to address this issue.

Step 1: The error that appears when you add a field from a different table is as follows.

Fig 1: Error 1_Linked not possible

Fig 2 Error 2_Record de-activated

This issue will appear when you add a field from another table without linking it to an existing table. To resolve it, save the flow and select “YES” when prompted. Your query tool will then be immediately deactivated. refer below image.

Fig 3_Query tool

To activate and make tables usable, correctly link them using the “Link” section in the Advanced tab.

Begin by incorporating the required fields from another table into the fields tab grid, as indicated in the following additions. This step simplifies the linking process and extends the functionality of the tables.

Fig 4_Fields

We’ve included the ‘TEXTE’ field from the ATEXTRA table to showcase additional descriptions on the dashboard. This enhancement simplifies the process while expanding the information available for display.

Step 2 :

Once you’ve added the necessary fields from other tables, proceed to link them with the tables whose data or fields will be displayed on the dashboard. This step streamlines the process and broadens the scope of information available for display.

To establish the connection between tables, you’ll require the index key of another table. Follow the process outlined below to effectively link the tables. This method simplifies the task and ensures seamless data integration.

To link tables, navigate to the “Links” section found in the Advanced tab.

Input the index key of the other table to establish a link between tables. For example, as shown in the image above, we’ve linked the PREQUIS table with the ATEXTRA table. This process streamlines data connectivity and facilitates seamless interaction between tables.

The data used for linking tables.

Index key of ATEXTRA table :

  • [F:AXX]AXX0 = CODFIC + ZONE + LAN + IDENT1 + IDENT2

Value which we have passed :

  • [F:AXX]AXX0 = ‘ITMMASTER’ ; ‘DES1AXX’ ; ‘ENG’ ; [F:PSD]ITMREF ; ”
[F:AXX]AXX0  = Index key of ATEXTRA table.

ITMMASTER   = It will display the data in which ITMMASTER is present in the field of CODFIC

DES1AXX        = It will display the data in which DES1AXX is present in the field of ZONE

ENG              = It will display the data in which ENG is present in the field of LAN

IDENT1           = It will display the data in which IDENT1 is present in the field of IDENT1

IDENT2           = It will display the data in which IDENT2 is present in the field of IDENT2

To link tables, use the index keys as demonstrated in the image.

After inputting the index key details to link the tables, you should save and validate the query tool. If the linking is correct, no errors will be displayed. However, if there’s an issue, an error message indicating “Links not possible” will appear. This step ensures the integrity of the linking process and identifies any potential errors for resolution.

Once you’ve successfully validated the query tool without encountering any errors, log out of Sage X3 and then log back in. Upon logging in again, you’ll find the required fields that you added from another table through linking data with index keys. This process ensures that the modifications made to the data display are properly reflected after re-logging into the system.

Now, you can view the necessary data from another table that you added to the fields of the query tool. You have successfully accessed the fields and data you needed.

Viewing all 20 articles
Browse latest View live